
Spokeo is another well-known data broker that gathers personal information from a wide range of sources, including public records, social media accounts, marketing data, and other third-party providers. This information is then compiled and displayed online, making it easy for anyone to search for you and view details about your life. The upside is that you’re not powerless. You have the ability to take control. Here’s a quick walkthrough on how you can protect your privacy by opting out of Spokeo
Step 1. Search for Your Name
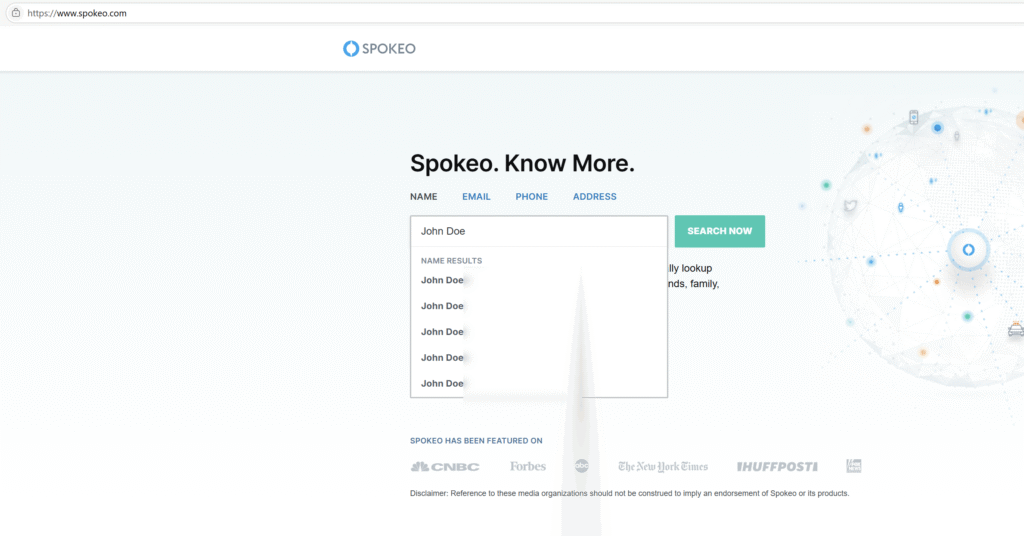
Start by visiting spokeo.com. On the homepage, you’ll see a search bar where you can type in your first and last name. For this example, let’s use “John Doe.” After entering the name, click on the Search Now button.
Step 2. Browse the Results
Spokeo will generate a list of possible matches for the name you entered. If your name is common, you might see dozens of results. Don’t worry-Spokeo makes it easier by allowing you to filter results by location. On the left-hand side of the results page, you can narrow it down to your city or state.
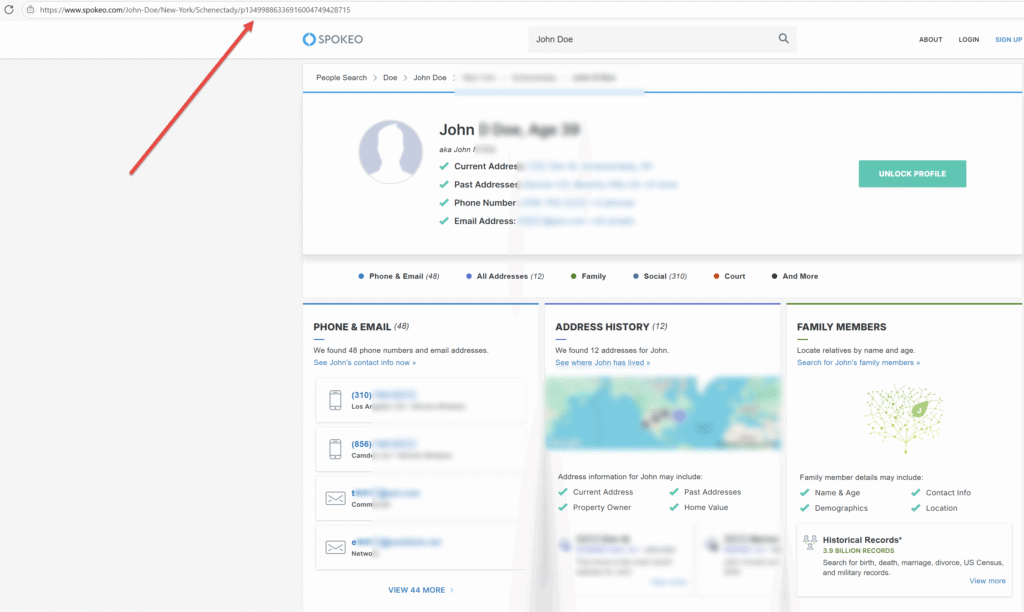
Once you identify the record that matches your personal information, click on See Results. This will take you to the specific page that contains your listing.

Step 3. Copy the Listing URL
On the listing page, look at the URL in the browser’s address bar. This web address is unique to your specific record. You’ll need to copy this URL, because Spokeo requires it for their opt-out form.
Tip: You might have more than one listing (for example, if you’ve lived in multiple cities or states). Be prepared to repeat this process for each one.
Step 4. Submit an Opt-Out Request
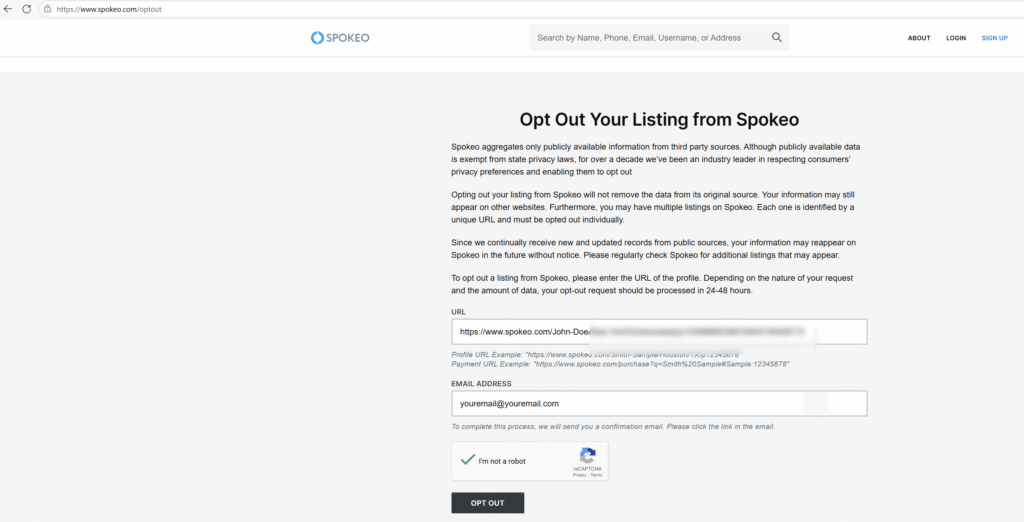
Next, go to the official Spokeo Opt-Out page at https://www.spokeo.com/optout. Scroll down until you reach the section labeled “Opt Out Your Listing.”
Here’s what you’ll do:
Paste the URL of your listing into the field provided.
Enter a valid email address. Spokeo will use this email to send you a confirmation link.
Privacy Tip: While you can use your personal email, I recommend creating or using a secondary email account just for opt-out requests. This way, you’re not giving your main personal email address to every data broker site.
After filling in the details, click “Remove This Listing.”
Step 5. Confirm the Removal
Shortly after submitting your request, Spokeo will send you a confirmation email. Open the email and click on the confirmation link inside. This step is required-if you don’t confirm, Spokeo will not process your request.
Once you’ve confirmed, your listing should be removed within 24-48 hours. You can search your name again later to verify that it has been taken down.

It’s common for people to have more than one Spokeo listing. This might happen if you’ve moved, changed phone numbers, or have multiple public records tied to your name. To ensure all your information is removed, repeat the steps above for every listing that belongs to you.
Final Tips
Check regularly: Even after removal, Spokeo may re-list your information if it reappears in public records. It’s smart to check every few months.
Do it for past addresses too: If you’ve lived in multiple states, make sure to remove all associated listings.
Expand beyond Spokeo: Spokeo is just one of many data broker sites. To fully protect your privacy, you’ll want to repeat this process with other sites like Whitepages, BeenVerified, MyLife, and more.